
In the ever-evolving world of makeup artistry, few techniques have captured the imagination quite like the cut crease. This striking eyeshadow style, renowned for its ability to create depth and drama, has become a go-to look for those seeking to elevate their eye game. Whether you’re preparing for a night out, a special event, or simply want to experiment with a bold new look, mastering the cut crease can open up a world of creative possibilities. In this step-by-step tutorial, we’ll guide you through the essentials of achieving a flawless cut crease, ensuring your eyes become the captivating focal point they deserve to be. Ready to unleash your inner artist? Let’s dive into the transformative magic of the cut crease.
Prepping Your Canvas: Perfecting the Base for a Flawless Finish
To achieve a seamless and stunning cut crease, it all starts with preparing your canvas. Begin by ensuring your eyelids are clean and free of any oils. This can be done with a gentle cleanser or micellar water. Next, apply a primer to create a smooth base that will help your eyeshadow adhere better and last longer. Opt for a primer that suits your skin type—whether it’s oily, dry, or a combination—to prevent any creasing or fading throughout the day.
Follow up with a concealer to neutralize any discoloration and create an even tone. Use a shade that matches your skin or is slightly lighter to brighten the area. Blend it out evenly using a beauty sponge or a brush, focusing on the areas where you plan to apply the cut crease. For added precision, lightly set the concealer with a translucent setting powder to lock everything in place and provide a smooth surface for blending your eyeshadow. This meticulous preparation ensures that your cut crease will be sharp, vibrant, and long-lasting.
Mastering the Cut: Techniques for Precision and Definition
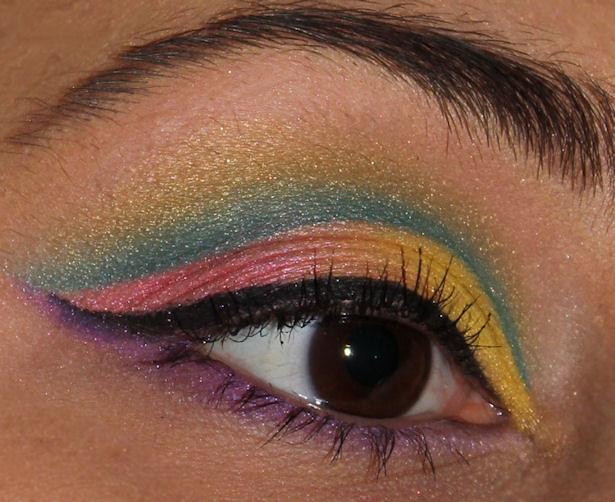
Achieving a flawless cut crease requires a few essential techniques to ensure precision and definition. First, start by applying an eyeshadow primer to create a smooth base and enhance the longevity of your look. Then, follow these steps:
- Map the Crease: Using a small, tapered brush, apply a transition shade slightly above your natural crease. This helps in creating a guideline for the cut crease.
- Define the Line: With a fine-tip brush and a darker eyeshadow, draw a sharp line along the crease, blending upwards to soften the edges.
- Cut the Crease: Use a flat brush and concealer to carve out the lid space below the crease line, ensuring a crisp and clean edge.
For added drama, pack a vibrant or shimmery shadow onto the lid where you applied the concealer, and blend seamlessly with the defined crease. Remember, the key to mastering this look lies in patience and practice.
Blending Like a Pro: Seamless Transitions and Color Harmony

To achieve a flawless cut crease, the art of blending is paramount. Start by selecting a transition shade that is slightly darker than your natural skin tone. Apply this shade to the crease of your eyelid using a fluffy blending brush, ensuring to diffuse the edges seamlessly. This creates a gradient effect that will serve as the foundation for your cut crease. Remember, the key is to build up the color gradually, adding depth without harsh lines.
- Choose Complementary Colors: For a harmonious look, pick shades that complement each other on the color wheel. This ensures that the transitions between colors are smooth and visually appealing.
- Layer and Blend: Use a clean brush to blend out the edges of each layer. This prevents any harsh lines and maintains a cohesive gradient.
- Highlight with Precision: Apply a lighter, shimmery shade on the lid to accentuate the cut crease. This not only adds dimension but also enhances the dramatic effect.
By meticulously blending each shade and maintaining color harmony, you can master the cut crease technique, creating dramatic and captivating eyes that stand out effortlessly.
Adding Drama: Enhancing the Look with Liner and Lashes
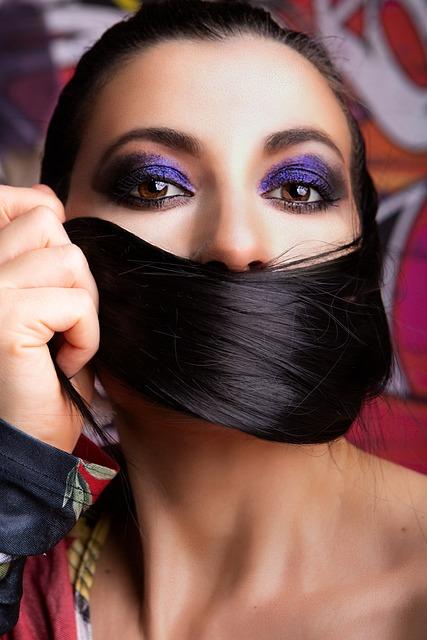
Now that your cut crease is looking sharp and defined, it’s time to elevate the drama with some liner and lashes. Begin by applying a gel or liquid eyeliner along your upper lash line. For an ultra-dramatic effect, extend the liner into a bold wing that complements the angle of your cut crease. Don’t be afraid to go thick with the line; the contrast will make your eyes pop even more.
Next, let’s talk lashes. Opt for voluminous, wispy lashes to add that extra flair. If you prefer a more natural look, choose individual lash extensions and layer them until you achieve the desired fullness. Here’s a quick guide:
- Adhesive: Use a strong, clear lash glue to ensure your lashes stay put all day.
- Application: Use tweezers for precise placement, starting from the outer corner and working your way in.
- Blending: Once the lashes are set, gently press them into your natural lashes with the tweezers for a seamless look.
Finish off with a coat of mascara to blend your natural lashes with the falsies, and voila! Your eyes are now a masterpiece of dramatic beauty.

