
In the world of beauty, the art of applying false lashes can transform an everyday look into something truly captivating. Whether you’re preparing for a special occasion or simply want to elevate your daily makeup routine, mastering the technique of seamless lash application is key. This guide will walk you through the steps to achieve a professional finish, ensuring your lashes blend effortlessly for a stunning, natural appearance. Ready to flutter with confidence? Let’s dive into the essentials of flawless lash application.
Selecting the Perfect Lash Style for Your Eye Shape
Understanding your eye shape is key to choosing the most flattering lash style, ensuring a natural and seamless finish. Here’s a quick guide to help you find the perfect match:
- Almond Eyes: Almost any lash style complements this versatile shape. Opt for wispy lashes to enhance your natural elegance.
- Round Eyes: To elongate and balance, choose cat-eye styles with longer ends. This creates a sultry, elongated look.
- Monolid Eyes: Go for multi-layered lashes with added volume to open up and define your eyes.
- Hooded Eyes: Select lashes with longer center strands to lift and brighten your eyes, creating a more open appearance.
- Downturned Eyes: A flare style will lift the outer corners, providing a subtle uplift.
Experiment with different lengths and volumes, but remember, the goal is to enhance your natural beauty while ensuring comfort and confidence.
Mastering the Art of Lash Adhesive Application
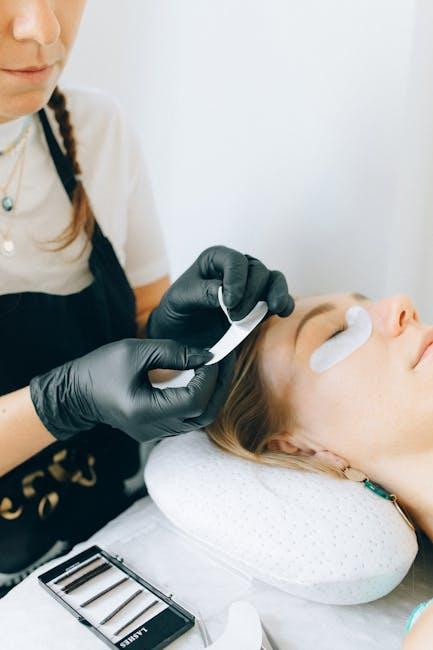
Achieving a flawless lash look starts with understanding the nuances of lash adhesive application. Begin by selecting a high-quality adhesive that suits your skin type and desired lash style. Clear or black adhesives are popular choices; clear offers a natural finish, while black can enhance the lash line’s depth. Before application, ensure your eyelids are clean and free from oils to promote better adhesion.
For a seamless result, follow these steps:
- Apply a thin, even layer of adhesive to the lash band. Avoid overloading the band, as excess glue can lead to clumping and discomfort.
- Wait 20-30 seconds for the adhesive to become tacky. This step is crucial for preventing slippage during application.
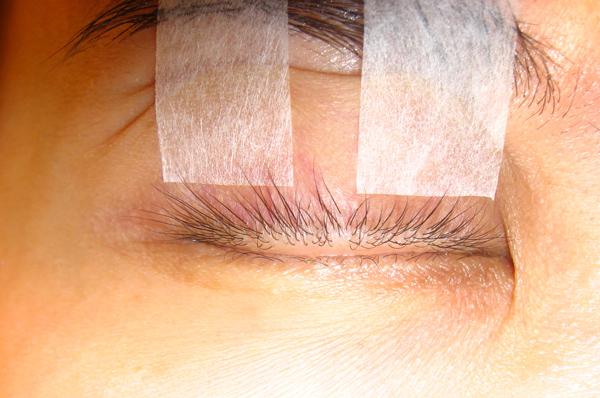
- Using tweezers or a lash applicator, position the false lash as close to your natural lash line as possible. Start from the center, then adjust the inner and outer corners for a perfect fit.
Mastering these techniques will ensure your lashes stay in place all day, providing a professional and polished look with every wear.
Techniques for Seamless Lash Placement
Achieving a flawless lash look begins with the right tools and techniques. Start by ensuring your natural lashes are clean and free of any oils or mascara. This provides a smooth base for the false lashes to adhere to. Using a lash applicator or a pair of tweezers, gently remove the lashes from their packaging, being careful not to damage the delicate fibers. Measure the lash strip against your eyelid and trim any excess from the outer corner to ensure a perfect fit.
Apply a thin layer of lash adhesive along the band, allowing it to become tacky for about 30 seconds. This is crucial for preventing slippage during application. Carefully place the lash strip as close to your natural lash line as possible, starting from the inner corner and working your way outwards. Use the applicator to press the strip into place, ensuring a snug fit. For a seamless blend, gently pinch the false lashes and your natural lashes together using your fingers or a lash tool. Finish with a coat of mascara if desired, and touch up with a thin line of eyeliner to conceal any gaps.
- Ensure lashes are clean and trimmed.
- Apply adhesive and let it set.
- Place lashes close to the lash line.
- Blend with natural lashes for a seamless finish.
Finishing Touches for a Flawless, Natural Look
- Blend with Mascara: Once your lashes are securely in place, apply a coat of mascara to seamlessly blend your natural lashes with the falsies. This step not only unifies the look but also adds an extra layer of volume and depth.
- Use a Lash Curler: Gently curling both your natural and false lashes together will enhance the lift and create a more cohesive appearance. This step is crucial for a natural finish.
- Fill in Gaps: If there are any noticeable gaps between your natural lash line and the false lashes, use a black or dark brown eyeliner to fill them in. This technique ensures a flawless transition and enhances the illusion of naturally full lashes.
- Adjust for Comfort: If the lashes feel too long or heavy, trim them to better fit your eye shape. A perfectly tailored lash strip can make all the difference in achieving a professional look.
For a subtle touch, lightly apply a neutral eyeshadow to soften the edges of the lash band, further integrating it into your makeup. These finishing touches are the secret to transforming false lashes from noticeable to naturally stunning, ensuring you step out with confidence and style.

